• Room Redo Up on Copy Cat Chic!

  • 4 years and a puppy

Showing posts with label brass. Show all posts

Thursday, October 3, 2013

DIY Brass Lindsay Adelman Chandelier - PART THREE

If you're just joining us, this is PART THREE of the Lindsay Adelman chandelier project. Check out the first posts here and here.


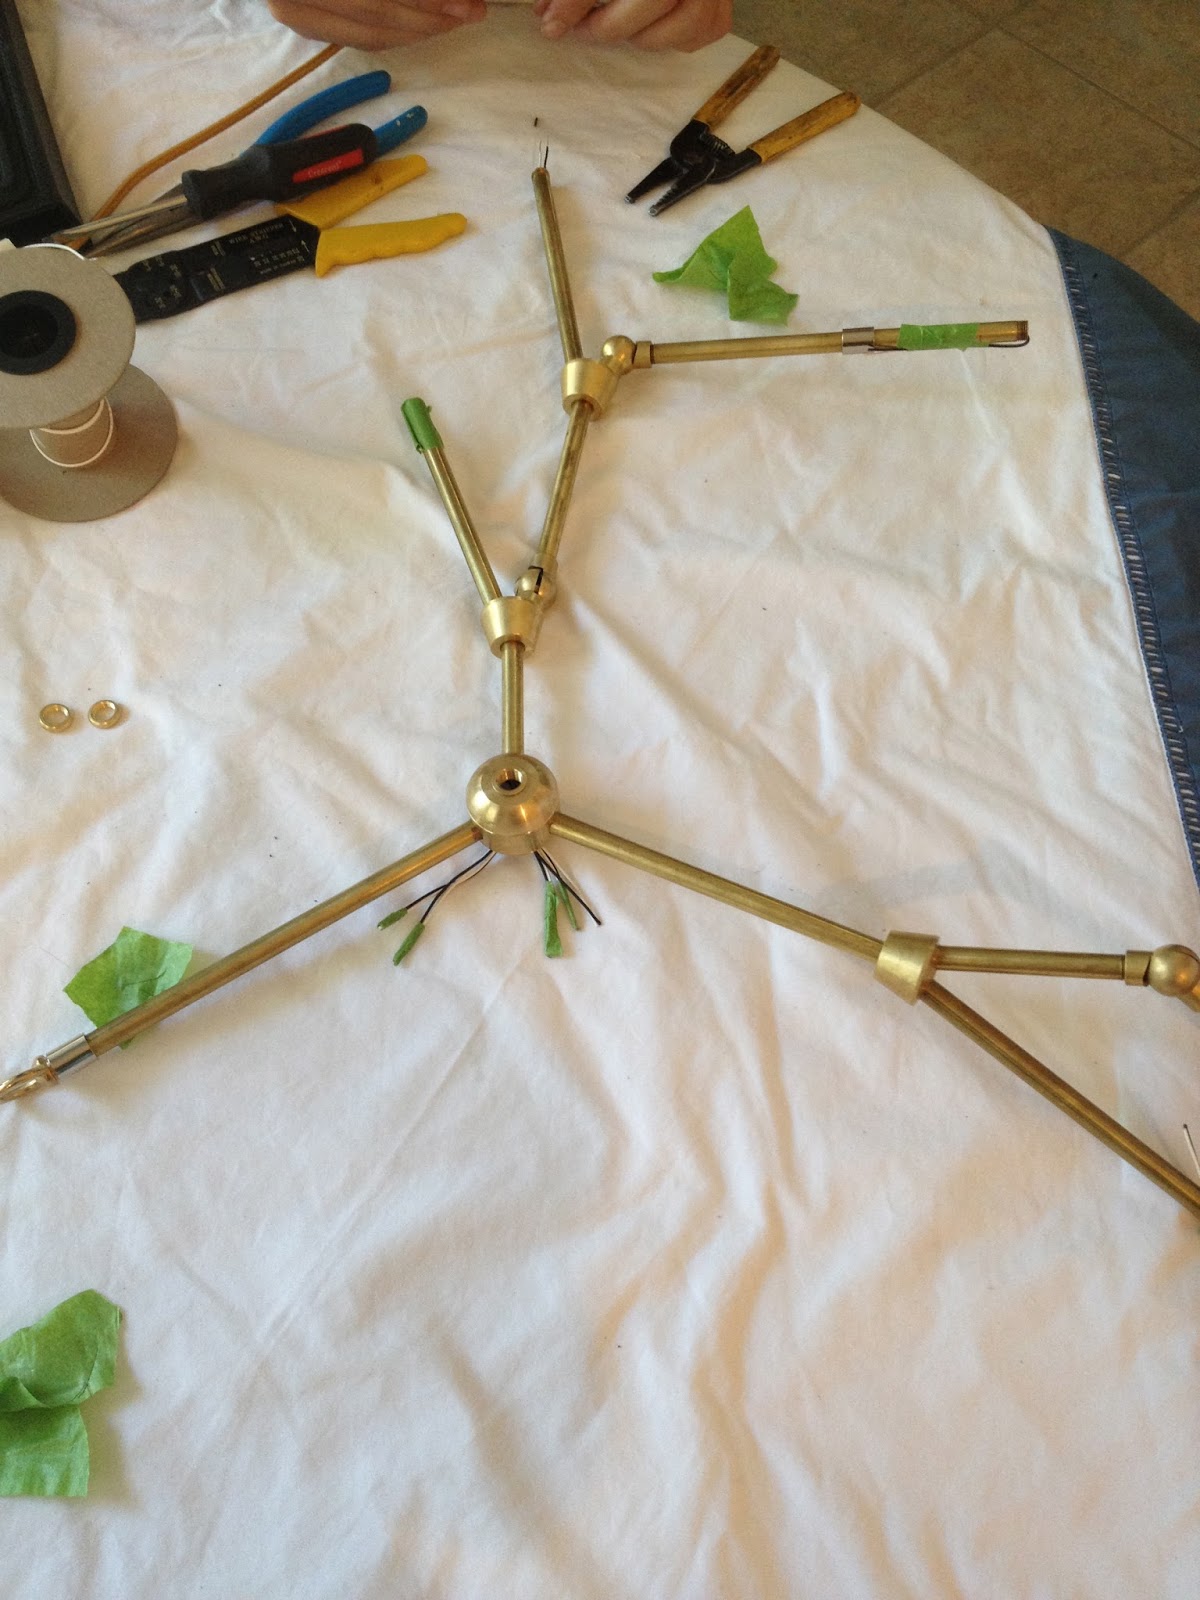
1. With all sockets wired and ready to go, we will refocus on the main hub, which has been collecting wiring pairs from each socket. For our chandelier design, there are five pairs of wires. 


Little helper Panda Bear! But seriously, kitty claws are sharp and can puncture the wiring insulation or shred your woven cord as seen above. (Jake knew we'd be taking pictures so he wore his best pair of 90s maternity shorts. You're so welcome.)


2. Begin by separating the wiring pairs. Strip all the wire ends just as we did at each socket. After stripping all 10 wires, tightly twist the individual wire strands into one stiff strand, careful not to break any of the tiny wires.


3. After twisting each wire, group each set of white/black wires and twist them tightly together. Make sure to include every wiring in each pairing and twist them into a stiff and straight line.


4.  Now feed the Rayon braided cloth wiring through the main vertical tube (the one that points toward the ceiling) and pull a few inches out of the hub end (seen above). The braided cloth frays badly when cut, so make a few passes with a cigarette lighter underneath the frayed end to stiffen it enough to pass through the tube (seen below).


5.  After pulling the Rayon wiring through the hub end, cut the cloth back to expose the two individually-wrapped wires inside. Strip each of these about 1".


6. Wrap the twisted pairs (as completed in Step No. 3 above) around the respective wire colors of the Rayon wiring, and add a tightly twisted wire nut onto each group of wire. Make a final check that only white wires are grouped together and that they're touching only white wires, and vice-versa.


7. Wrap each combined wire pair with electrical tape, beginning at the wire nut and working downward as far as you can. Make a final check that no wire strands are exposed, then stuff both pairs into the hub and screw on the brass hub cover.


8.  Add the round hook at the end of the main tube and pass the Rayon wiring through it (above).


9. At this point, your plans may diverge from ours slightly. If you're going ahead with the plug-in option, wire the plug to the other end of the Rayon wiring using the Adelman plug wiring instructions. You will also need to provide a structure on the ceiling which the hook will mount to (a simple garden hook will work), and a method of hanging/swagging the wiring to the ceiling or wall.

Our setup will be hard-wired to the previous light fixture's wiring, and those are the steps shown below.


10.  The switch-out of our old junction box to a new shallower one was briefly described in Part I of this DIY.

SAFETY WARNING!!
You are working with live wiring, and will therefore need to turn your circuit breaker off before you even think about touching the wires in the ceiling. Use a circuit tester (with good batteries) to first test a live socket in the house to ensure the tester is working properly, and then test the wiring in the ceiling to ensure it is off.


11.  We installed our low profile junction box and pulled the wiring through.


12.  Thread the ceiling canopy over the Rayon wiring, and then have someone hold the chandelier while you wire the Rayon wiring to the existing ceiling wiring. Again, use wire nuts and wrap the pairs with electrical tape.


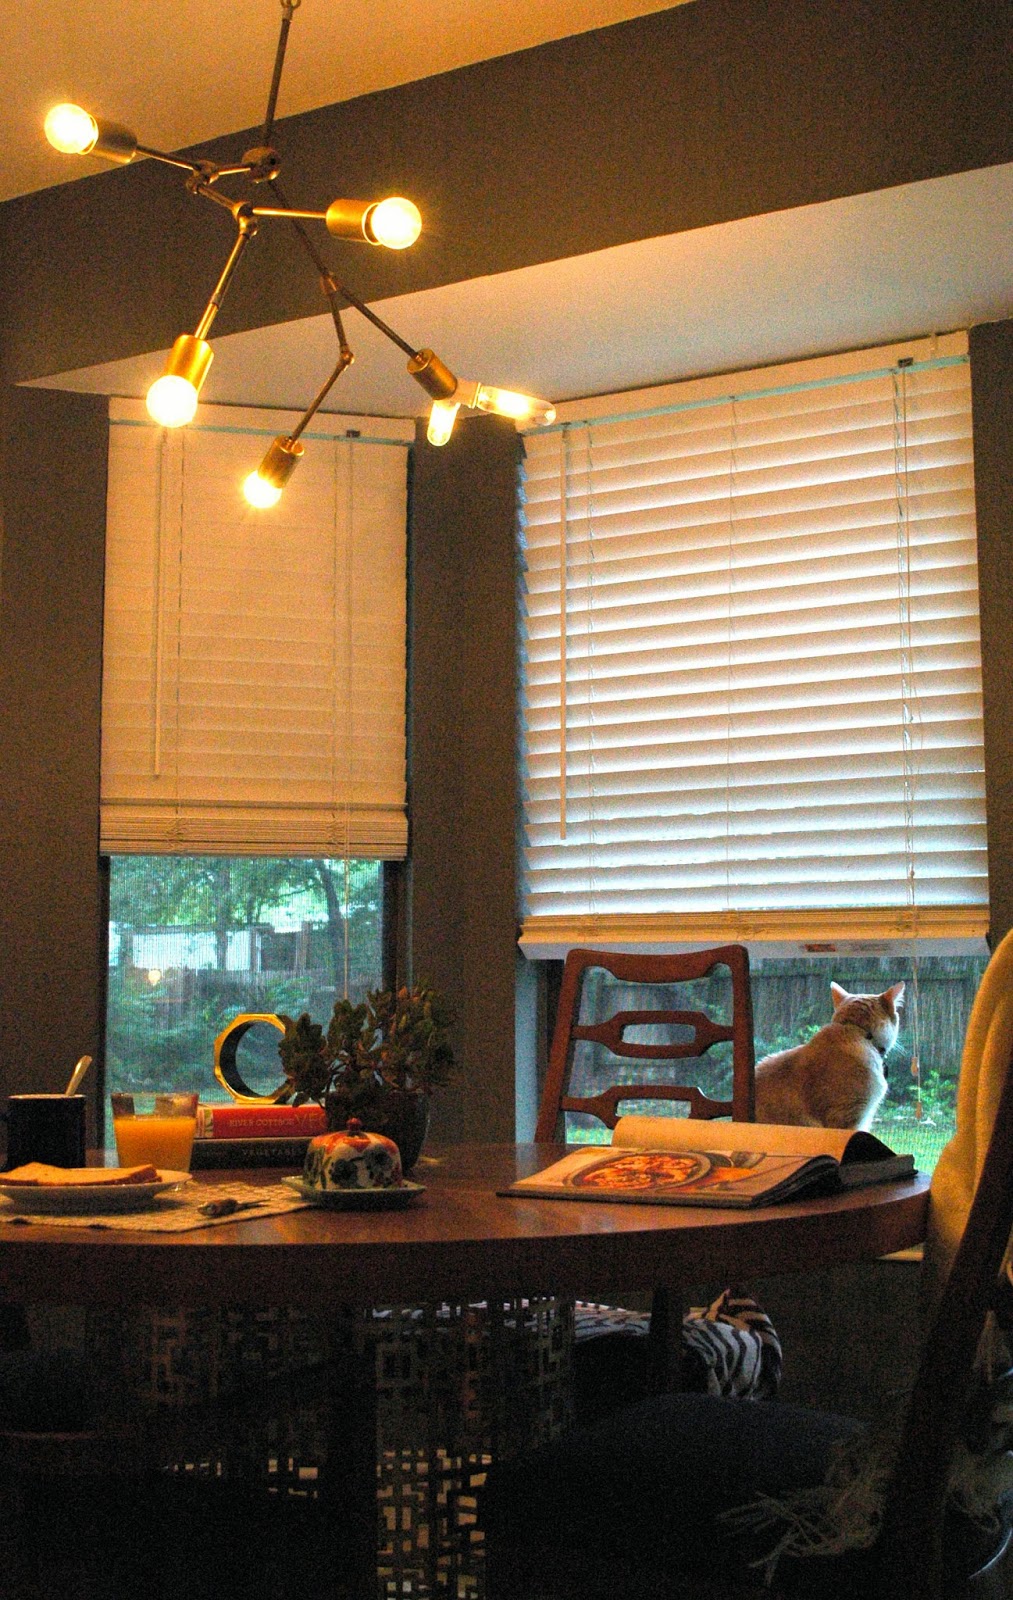
13. At this point, the final step is simply to attach the canopy to the ceiling. Here are some moody evening glamour shots of the chandelier for your enjoyment.


Thanks for sticking with me through three monster posts, and I hope you are feeling inspired and motivated to build yourself a beautiful chandelier. Good luck!!


DIY Brass Lindsay Adelman Chandelier - PART TWO

If you're just joining me on this chandelier journey from hell FunTown, this part TWO of THREE. (For the record, I'm kidding. Building this was way fun and relatively easy.) If you're just joining us, you can catch PART ONE right here, where we discussed the parts that you'll need to order and the tools that you'll need to put this beauty together:


Due to the sheer volume of photos (and the lack of electricity for great lighting), these photos are not as blog-worthy as I'd like. But I assure you that my iPhone pics will get you through this just fine. Jumping right in...


1. The first thing we had to do was deal with a rogue junction box in our ceiling. It was meant to hold up a ceiling fan, so there was a good 1.5" hanging down from the ceiling. No bueno; our ceiling canopy was nowhere near this deep. So we bought a shallower circular one at Lowe's and changed it out before we started building (this may not be an issue for you so we didn't put it in the parts list. If you need it, the link is HERE.)


2. Cat helpers always say they want to help but then they just lay down. Don't be fooled.


3. Here is a picture of our parts laid out. Wrinkled work sheet is optional, but my walnut tabletop was not about to get chandelier gouges in it. The complete parts and tool list can be found in PART ONE.


4. At this point you will want to basically do a test-run assembly of your chandelier before you get to any of the wiring. The assembly process took me all of three minutes; I knew what design I wanted and just pieced the individual components together until I found what worked. But you may want to take some time to play with the proportions and figure out where you want the arms to stick out. This part is very interpretive. It helps to have two sets of hands here, so one person can hold it up while the other person adjusts and tightens as necessary. This also helps ensure that the light is balanced correctly once the light is hanging on its own. I highly, highly recommend taking some pictures of this process so you don't forget your configuration when you disassemble it for the wiring.


4b. I'm serious--take pics of your configuration.


5. At this point you'll need to disassemble your chandelier so you can begin your wiring journey. I found it helpful, when possible, to keep the parts in my general desired shape, especially since those brass tubes are different lengths and there are just too many moving parts to keep everything straight. In hindsight I would maybe even consider a labeling system if you're so inclined, but we obviously did it without one.

At this point we start using our black and white wires to connect all the arms of the chandelier to the central body. You can refer to Ms. Adelman's general wiring diagram for an idea of what goes where:


6. Each light socket will require a black (power) and white (neutral) small-gauge wire. The black/white pairs will snake from each socket, through the hollow tubes and fittings, and into the central hub (the "cluster body"). 


7. Beginning at the socket end, tape a wire pair together to form a pointy end; it will be easier to route through the tubes and joints. When you have snaked a pair all the way to the hub, pull a minimum of 3" out of the hub and tape it to part of the assembly so it won't pull out. Back at the socket end, cut the wire pair 3" beyond the tube end. Tape the wire to the tube as shown above.


When you're watching your mother-in-law route the wire through the joints (above), loosen the adjustable joints with a screwdriver and straighten them to make the threading easier. Final adjustments or reconfiguration of the chandelier can be made any time after final assembly.


As described in Step #7 above, all wire routes will end at the hub/cluster body. The pic above shows the combined groups of wire pairs taped to one leg of the assembly.


Routing through the joints is tricky, especially the 2-into-1 joints, but I promise you it will work. My best advice is to take your time and don't force anything. Unscrew the joints to check the progress of a route if necessary.


9.  Once all socket ends are successfully routed to the hub and securely taped to the tubes, it is time to wire the sockets. The diagram below is very helpful and should be studied carefully before beginning, and will help you remember the correct order for all the steps. We were a little too cavalier, and several times we wired a socket without first installing the socket cup (which means you have to undo and re-do everything you just did). Moral of the story: create a checklist for each socket installation.


10. The wire pairs should be stripped with the proper gauge strippers. If you have never stripped wire, we recommended you watch a Youtube video first and practice on extra wire from the project (this is not the time to practice on the job). Strip each wire 1/2" from the end and twist the tiny wire strands together to create a solid single strand. Be very careful not to cut through the wire as you only have  about 3" to work with.


11. The stripped/twisted wire pair should then be lightly twisted around the socket screws as shown in the pic above. Be sure to place the black (power) wire on the brass screw/terminal. The white (neutral) will be installed with the silver-colored screw/terminal.  


Be sure you have installed the slip ring and socket cup (in that order) prior to feeding the screws/wires through the top threaded socket ring, as shown above.


Screw the wired screws into their respective terminals and give it a last check before continuing (its easier to make a final check here than when one of the sockets doesn't work at the end). The wires should be securely fastened to their terminals with no wild strands.


At this point, Ella jumped in a shopping bag and work straight up ceased for about 5 minutes while I carried her around (refer to Part One for my advice on kitty helpers). Jake found this only borderline amusing.


12.  Slip the brass tube down into the top threaded socket ring and screw firmly into place. Wrap the exposed screw terminals and wiring with electrical tape. In our case, the tape also acted to prevent the socket cup from sliding too far down on the socket and hitting the round bulbs. You'll want to test fit a round bulb in the socket at this point and see if your socket cup is too shallow and contacts the bulb. If it's touching the bulb (thus preventing the bulb from screwing in completely), just add more tape farther up the brass rod. We liked the mix of bulbs, but using all tube-style bulbs would eliminate the problem altogether. 


I'm so glad you've made it this far with us! There's only one more post to go and then you're home free!


                                 Part ONE | Part TWO | Part THREE

DIY Brass Lindsay Adelman Chandelier - PART ONE

I recommend getting yourself a 32 oz. coffee and a comfy pair of pants, because this project is going to be a doozy y'all. I'd even recommend swapping out your contacts for your glasses.

Jumping right in--has anyone else been coveting these Lindsay Adelman light fixtures? I have. Oh, I have I have I have. I want a brass one in every room of my house.


WELL TOO BAD, FRIEND--they're $15k a pop. So if you, like me, were starting to halfway imagine trading in your car for a light fixture, I bring you glad tidings. I mean, THE GLADDEST OF TIDINGS YOU GUYS.

Lindsay Adelman (not to be confused with Lindsey Does, this blog) understands the sick burning need you have for this chandelier in your dining room, so saint that she is, created a parts list and a general guideline for DIYing your own amazeballs version at home. Instead of this fixture being flat out unattainable, you can spend about $130 and part of your Sunday creating an even better looking brass version. Truth. Speaking as someone who is scared crapless of electricity (I know, I'm such a girl) I can assure you that this is completely doable and not at all scary. You'll just need some patience and some nimble-ish fingers (and a helper--can't emphasize that enough). And you will be rewarded with this:


Here's the deal though--the parts list is not everything you need, particularly if you want a hard wired version instead of the plug-in version specified by the parts list. It also doesn't include the ceiling canopy, and that was actually a little difficult to find (don't worry, this will not be a problem for you). And while there is a very helpful wiring guide, there is not a start to finish breakdown for building this magnificent piece, so I am ever so thankful for my electrical genius engineer of a man who was able to make this project happen for me. Sweet Jake, fetcher of water when I'm thirsty and builder of chandeliers when I'm desperate, I cannot shout it any louder that this never would have gotten past the parts ordering stage without him.

Anyways--I'm breaking this project up into a three separate posts since there's just so many pics and so much info I need to give you. I'm going to start with the parts and source lists, since you'll have to order most of it. Believe me when I say that waiting anxiously for all your supplies to arrive is actually the toughest part of this whole project. You can do this!!


PARTS LIST & WIRING DIAGRAM

This wiring diagram is a great reference for you, and you will need it. The letters in the list below correspond to this rendering.

From grandbrass.com
A. 1 plug - item # PL183PBK (optional--ours is hard wired so we didn't order this part, but LA does provide a wiring diagram for this)
B. At least 3 feet of wire (again, ours is hardwired and only needed to run to the ceiling junction box. If you choose to use a plug option, add on the distance to your preferred outlet) - item # WI18POG
C. 1 brass loop - item # LO111
D. brass pipes, various lengths:
    2 brass pipes - item # PIBR07-0X8
    3 brass pipes - item # PIBR03-0X8
    1 brass pipe - item # PIBR05-0X8
    3 brass pipes - item # PIBR06-0X8
    2 brass pipes - item # PIBR04-0X8
E. 3 nuts - item # NU430
F. 1 cluster body - item # BOLG3
G. 3 brass swivels - item # SV140
H. 2 coupling bodies - item # NE449NP
I. 5 sockets - item # SO10045
J. 5 tubular bulbs - item # BUET10C40*
K. 1 globe bulb - item # BUEG16C40*
L. 5 slip rings - item # SR0-3/8
M. 5 brass cups - item # CU578
N. 3 brass cluster bodies - item # BOT2
    2 steel nipples - item # NI0-1/2X1/8 (not shown on the diagram)
    1 brass reducer - item # RE1/8FX1/4MS (not shown on the diagram)
O. 2 plug buttons – item # FI1/8PLUG 

*I recommend ordering more than you need of each bulb type. I wasn't sure how easy it would be to find them locally when I needed to replace them, and I also wanted the freedom to play around with how I arranged them in the chandelier since I used a mix of both. They're pretty cheap so I ordered 7 or 8 of each.

From amazon.com
P. 1 twin socket adapter


From mcmaster.com
 1 box of wire connectors - item # 7108K32 (not shown on the diagram)
 12 feet of white wire - item # 7587K138 (not shown on the diagram)
 12 feet of black wire - item # 7587K133 (not shown on the diagram)
 1 black electrical tape - item # 76455A21 (not shown on the diagram)
 wire strippers - item # 7660k14 (also in tools list)
*If you are hard wiring into existing ceiling wiring, you may need slightly larger wire connectors. You can always pick these up at the big box stores.


From Snake Head Vintage on etsy.com
 1 ceiling canopy (polished satin brass)
   **this store is AWESOME and so cheap, plus shipping only took like two days.


TOOLS NEEDED


Wire strippers - 7660k14 (McMaster)
Small to medium flathead screw driver
Socket tester with good batteries
Step stool or chair
Optional but recommended: Small to medium Phillips-head screw driver  


When you have all of these things on hand, you'll be ready to move onto PART TWO!


                                Part ONE | Part TWO | Part THREE